Wednesday, 14 April 2010

Using leftover Paints to create beautiful vases....

Thinking of what to do with all the left over paints in your containers. Then this is what you should do. Try this technique of using your last few drops of paint creatively. This is solely for non-artistic people.
Call this Modern or Contemporary art or an item of dramaticism..................
Things you will need:
  • a few flavoured milk bottles (Nandini milk bottles to be precise)
  • 1 round paint brush
  • Oil enamel paint- Base colour of your choice...(here it would be whichever colour is more in quantity)
  • Oil enamel paint- a few droplets of all the leftover paints
  • a litre of water
  • a waste cloth
  • 20 mins of your time.
Method:
  1. Clean the bottles and wipe them dry.
  2. Apply a base coat (oil enamel) in any colour of your choice.
  3. Ensure that you either apply the paint to the bottom half or top half of the bottle for two reasons. One, it looks nice to create a pattern with bottles if you have many. Two, If you paint the whole bottle, you may end up leaving finger prints. If you still want to paint the complete bottle, ensure that you do the top half first and then do the bottom half.
  4. Now take a large bowl of water, add a few drops of different colours of paint. Do not worry about being precise...remember, i already mentioned that this needs no skills of art.
  5. Use a toothpick to stir the paint in order to create random patterns. To give some punch to this lets call this retro pattern.
  6. Without wasting any time, you have to dip the painted portion of the bottle into this water carefully without stirring the water. Slowly immerse the bottle once and take it out. Do not repeat this step.
  7. Allow the bottle to dry.

VOILA !!!!!!!!!!!!!!!!your vases are ready and it takes only a few minutes..........LITERALLY!!!!

Please write to me if you have any queries before doing this.

Monday, 12 April 2010

Easy Kitchen Artwork.....

As I promised, this is the second post for the day. I recently bought some stickers from a stationery shop (not with any intention...but... just because it looked nice on the shelf). It was a pack of soft stickers which had a 3D look. I then found a canvas board (10"x12") in my shelf. I decided to make use of the canvas and the stickers to create this art piece for my kitchen.

Things you need to do this:
1 canvas board, a few stickers to suit your theme or concept, 1 round brush, 1 black Acrylic paint tube, 1 red acrylic pain tube, 1 white acrylic paint tube, a cup of water and 30 mins of your time.

Sharing some easy garden deco ideas from Tessa Evelegh's book

Hi Readers,
Ya...I know that I have been away from blogging for a while now...and I am very sorry about it. I received mails from so many of my regular visitors requesting updates on my blog. I am extremely sorry about this as I got busy with work. However, as a compensation to my absence, I will publish 2 posts today. Both the posts are some easy and faster DIY ideas. I am sure you will love them as much as I do...

This post features some simple garden decor ideas from the book 50 fabulous ways to decorate your garden by Tessa Evelegh. As I always emphasise, I prefer more of re-invention from old stuff. Considering the Global warming that is happening, I strongly feel that one can do a lot by re-using the old stuff in many creative ways. Some easy to do ideas for your garden are here for you to see....
Mexican Painted Pots
Plants in Containers
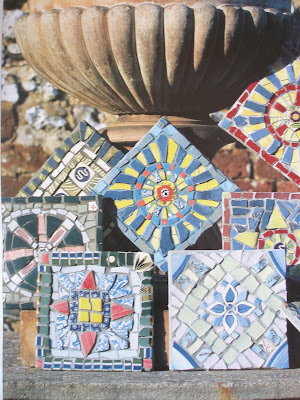
Stick broken tiles and create small Mosaic art for your Garden......big or small
I just loved this.....TIN CAN...Plant Nursery...
I hope you all liked this post and I am sure you will try some simple ideas like this from most of your throw away products at home. If you do try...please mail me a picture and I would love to showcase your work here.
(All pictures on this post are from the book 50 fabulous ways to decorate your garden by Tessa Evelegh)